Whether you’re a trained nail technician or someone who simply loves a perfect at-home manicure, investing in a professional nail kit can completely change the game. The right tools don’t just make the process easier — they make your results look genuinely polished (pun very much intended). In this guide, we’ll walk through everything you need to know: what’s actually worth buying, how to choose a kit that fits your skill level, common mistakes to avoid, and the best practices that separate amateurs from the pros.
What Is a Professional Nail Kit?
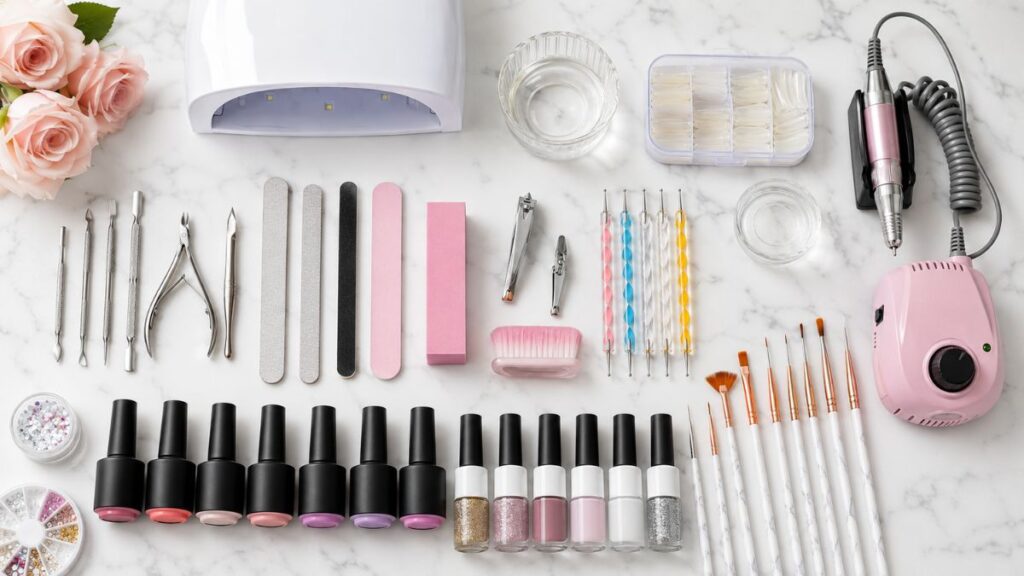
A professional nail kit is a curated collection of tools and supplies designed to perform complete nail care — from prep and shaping to finishing and maintenance. Unlike drugstore grab-bag sets, professional kits are built with durability and precision in mind.
A standard professional nail kit typically includes:
- Nail clippers (fingernail and toenail versions)
- Cuticle pushers and nippers
- Nail files and buffers (multiple grits)
- A nail drill or electric file (in advanced kits)
- UV/LED lamp for gel curing
- Gel or acrylic brushes
- Dotting tools and nail art accessories
- Sanitizing and prep supplies
The difference in quality between a basic kit and a professional one comes down to the materials — stainless steel tools, proper grit ratings on files, and motor strength on electric drills all matter more than most people realize.
What’s Inside a Professional Nail Kit — A Closer Look
Not all kits are created equal. Understanding what each tool does will help you decide what you actually need versus what’s just marketing fluff.
Essential Tools Every Kit Should Have
Nail Files and Buffers Files come in different grits — lower numbers (80–100 grit) are more abrasive and used for shaping acrylics or gels, while higher numbers (180–240 grit) are gentler and better for natural nails. A buffer smooths ridges and adds shine without polish.
Cuticle Care Tools A good cuticle pusher gently moves back the skin without tearing, while nippers trim away dead skin only — never live tissue. This is where most beginners go wrong, and good tools make a real difference.
Nail Drill / Electric File Electric files (also called e-files) have become standard in professional settings. They speed up the prep and removal process significantly, but they require practice and the right drill bit attachments for different tasks.
Specialty Add-Ons Worth Considering
| Tool | Purpose | Skill Level Needed |
|---|---|---|
| UV/LED Lamp | Cures gel polish and gel extensions | Beginner–Intermediate |
| Acrylic Brush Set | Applies acrylic powder to tips | Intermediate–Advanced |
| Nail Art Brushes | Fine-line detail work and nail art | All levels |
| Gel Cleanser | Wipes tacky residue from cured gel | Beginner |
| Dehydrator & Primer | Preps natural nails for better adhesion | Intermediate |
| Dappen Dish | Holds monomer liquid during acrylic work | Advanced |
How to Choose the Right Professional Nail Kit
Picking a kit blindly is one of the most common — and most expensive — mistakes people make. Here’s how to approach it smartly.
Match the Kit to Your Skill Level
Beginners don’t need a nail drill on day one. Starting with a solid manual tool set — quality files, proper cuticle tools, a good lamp, and gel polishes — gives you the foundation to learn technique without the risk of damaging your nails with power equipment.
Intermediate users who already understand nail prep and gel application can move toward kits that include an e-file, extension tips, and a broader brush collection.
Advanced users and working nail technicians should look at professional-grade brands and build a custom kit rather than relying on bundled sets. At this level, the individual tool quality matters more than package convenience.
Comparing Kit Types: What to Look For
| Kit Type | Best For | Typical Price Range | Key Features |
|---|---|---|---|
| Basic Manual Kit | Beginners, home use | $20–$60 | Files, clippers, cuticle tools, buffer |
| Gel Starter Kit | Intermediate home users | $60–$150 | UV lamp, gel polishes, brush set |
| Full Professional Kit | Nail techs, salon use | $150–$500+ | E-file, lamp, full brush set, acrylics |
| Nail Art Specialty Kit | Creative enthusiasts | $40–$120 | Art brushes, dotting tools, stamping plates |
Key Quality Indicators to Check
- Stainless steel tools — they last longer, resist corrosion, and can be properly sanitized
- Double-sided nail files — versatile and worth the small upgrade
- Lamp wattage — 48W or higher for reliable, even gel curing
- Drill RPM — look for at least 30,000 RPM for professional use
- Case or storage — a well-organized carrying case keeps tools sanitary and extends their life
Pros and Cons of Investing in a Professional Nail Kit
Pros
- Cost savings over time — salon manicures add up quickly; a quality kit pays for itself
- Convenience — do your nails on your schedule, at home
- Better hygiene control — your tools, sanitized your way
- Skill development — with practice, your results genuinely rival salon quality
- Customization — build exactly the look you want without limitations
Cons
- Learning curve — especially with power tools like e-files and acrylic brushes
- Upfront cost — a quality professional setup isn’t cheap
- Time investment — salon visits are faster until you’ve built up your skills
- Storage space — full kits take up real estate in your bathroom or workspace
- Tool maintenance — sanitizing, replacing files, and keeping drills clean takes effort
Common Mistakes to Avoid
Even experienced home users fall into these traps. Avoiding them from the start saves you a lot of frustration — and a lot of broken nails.
1. Buying the cheapest kit available Budget kits often include tools that are too thin, too dull, or made from materials that can’t be properly sterilized. A slightly higher investment upfront means tools that actually work and last.
2. Skipping nail prep Proper prep — dehydrating the nail, using a primer, pushing back cuticles — is what makes polish and gel actually adhere correctly. Skipping it is why so many at-home manicures lift or peel within days.
3. Using the wrong file grit Using a coarse acrylic file on natural nails thins the nail plate significantly. Always match the file grit to the nail type you’re working on.
4. Overcuring gel polish More curing time doesn’t always mean better results. Overcured gel can become brittle and lift at the edges. Follow the manufacturer’s recommended cure times for the lamp wattage you’re using.
5. Ignoring sanitation Tools should be sanitized between every use — not just rinsed under water. Use a proper nail tool sanitizer or hospital-grade disinfectant wipes, and store clean tools separately from used ones.
6. Rushing the process Each layer of polish, gel, or acrylic needs proper drying or curing time. Rushing this step almost always leads to smudges, bubbles, or premature chipping.
Best Practices for Using Your Nail Kit
These habits separate people who get mediocre results from those whose nails consistently look like they just walked out of a salon.
Before You Start
- Wash your hands thoroughly and push back cuticles gently after a warm soak
- Lightly buff the nail surface to remove shine and improve adhesion
- Apply dehydrator, then primer (for gel or acrylic applications)
- Lay out all your tools in order of use — this keeps the process smooth and sanitary
During Application
- Apply polish or gel in thin, even layers — thin layers cure better and last longer
- Cap the free edge of each layer to seal the nail and prevent lifting
- Wipe the brush on the neck of the bottle to remove excess product before each stroke
- Keep gel away from the cuticle and skin to prevent lifting
After You’re Done
- Wipe away the tacky inhibition layer from gel with a cleanser on a lint-free wipe
- Apply cuticle oil to nourish the surrounding skin and extend wear time
- Clean all tools immediately — never let product dry or harden on brushes or metal tools
- Store everything in a clean, dry case or pouch
Conclusion
Choosing the right professional nail kit is less about spending the most money and more about understanding what you actually need. Whether you’re just starting your nail care journey or you’re ready to level up from a basic set, the key is to buy quality tools that match your current skill and grow with you over time.
A well-chosen kit — with the right files, a reliable lamp, clean cuticle tools, and a few quality brushes — will deliver results that look genuinely professional with a little practice. Take your time, avoid the common pitfalls, and remember that technique matters just as much as the tools themselves.
Start with the basics, learn the fundamentals, and build from there. And if you want to go deeper into nail care techniques, product choices, and expert tips, our complete pro nails guide covers everything you need to take your nails to the next level. Your nails (and your wallet) will thank you.
Frequently Asked Questions
A beginner’s professional nail kit should include a nail file (180 grit), a buffer block, cuticle pusher, nail clippers, a UV/LED lamp, gel base and top coat, and at least a basic gel color selection. These tools cover the core manicure process without overwhelming complexity.
A quality entry-level professional nail kit typically costs between $60 and $150. Full professional kits for nail technicians — including an e-file, UV lamp, and acrylic supplies — can range from $150 to $500 or more depending on brand and quality.
Yes, with proper technique and sanitation. The key is to learn the correct use of each tool, especially power tools like e-files, and to sterilize everything before and after use. Starting with manual tools before progressing to electric ones is recommended for beginners.
Metal tools should be wiped with a hospital-grade disinfectant or soaked in a barbicide solution. Nail files and buffers cannot be fully sanitized and should be replaced or used on one person only. Brushes should be cleaned with brush cleaner or acetone and stored dry.
A gel nail kit uses UV or LED light to cure gel polish and gel extensions — it’s generally easier for beginners and produces a flexible, glossy finish. An acrylic nail kit uses a liquid monomer and acrylic powder to build extensions — it’s stronger but requires more skill and proper ventilation during use.