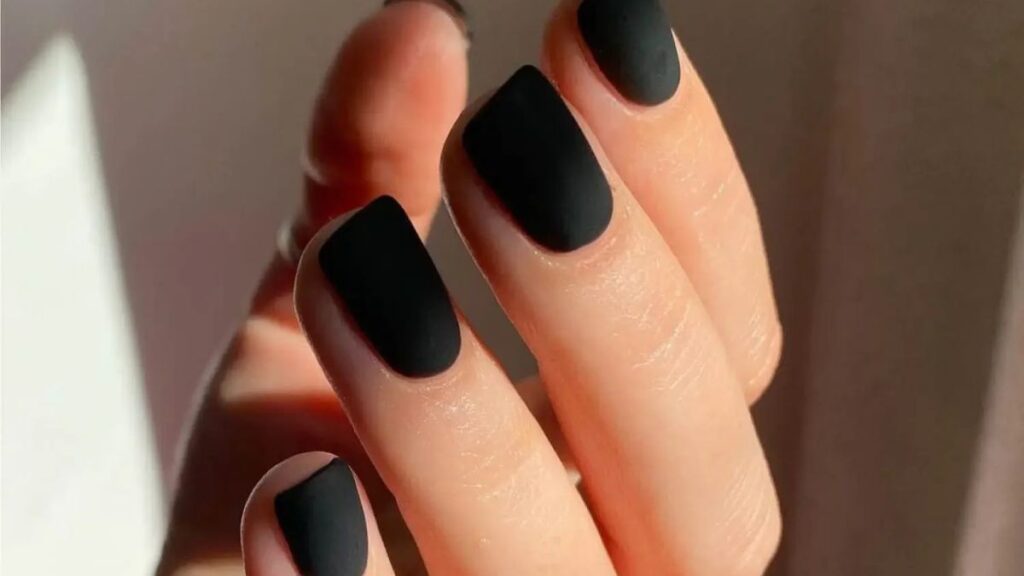
There’s something irresistibly magnetic about nail art black design. Whether it’s a sharp geometric pattern on a matte base, delicate floral linework, or a bold negative-space look, black nails have a way of making a statement without saying a single word. It’s one of those rare beauty choices that works across every season, every occasion, and every personal style.
In recent years, black nail art has moved far beyond a simple coat of dark polish. Today’s trends are all about creativity — layering textures, mixing finishes, and experimenting with motifs that range from ultra-minimal to deeply intricate. If you’ve been wondering how to elevate your nail game with dark-toned designs, you’re in exactly the right place.
Why Black is the Ultimate Nail Color
Black nail polish has a timeless quality that few other shades can match. It works as a neutral when you want it to and as a bold statement when you need it to. More importantly, it’s the perfect canvas for nail art.
Unlike lighter bases, black makes colors pop — gold shimmer glows warmer, white linework looks crisper, and metallics hit harder. The contrast factor is unmatched. That’s why so many nail artists reach for black as their starting point when they want maximum visual impact.
The psychology behind dark nails
Black is associated with confidence, sophistication, and a certain effortless cool. Wearing black nail art isn’t just a beauty choice — it’s a personality statement. Studies in color psychology suggest that people who gravitate toward dark nail colors tend to project self-assurance and a strong sense of personal identity. No wonder it’s a perennial favorite.
| Black Nail Finish | Best For | Pairs Well With | Longevity |
|---|---|---|---|
| Matte black | Minimalist & everyday looks | Gold foil, white linework | 5–7 days (regular polish) |
| Glossy black | Classic elegance, formal events | Rhinestones, chrome powder | 7–10 days with top coat |
| Gel black | Long-lasting wear | Any art technique | 2–3 weeks |
| Textured/glitter black | Night out, editorial looks | Negative space, foil | 5–7 days |
Trending Nail Art Black Design You’ll Want to Try
The world of black nail art is far from one-note. From barely-there minimalist strokes to full-on maximalist nail masterpieces, here’s a breakdown of the most popular styles trending right now.
1. Geometric and graphic patterns
Think clean lines, sharp angles, and bold shapes. Geometric nail art on a black base uses contrasting colors — white, gold, silver — to create optical illusions and modern graphic looks. Half-moon designs, diagonal splits, and grid patterns are especially popular right now.
2. Negative space nail art
Negative space designs use the natural nail (or a nude/clear base) as part of the artwork. On a black background, leaving small windows of bare nail creates a striking, architectural effect. It’s sophisticated, artistic, and surprisingly easy to achieve with nail tape.
3. Marble effect on black
Reverse marble — white or gold veining on a black base — is a luxe take on the classic marble look. The result feels high-end and editorial. A fine brush or a toothpick dragged through wet polish is all you need to achieve it at home.
4. Floral and botanical line art
Delicate white or pastel flowers drawn over black polish create a striking contrast. This style leans romantic and artsy, making it a favorite for weddings, festivals, and editorial shoots. Thin nail art brushes are your best tool here.
5. Chrome and metallic accents
Rubbing chrome powder over black gel polish creates a mesmerizing mirror-effect nail. You can apply it over the entire nail or use stencils to create chrome designs on specific sections. The result is futuristic and instantly eye-catching.
| Black Nail Art Style | Skill Level | Time Required | Key Tool |
|---|---|---|---|
| Geometric / graphic | Beginner–Intermediate | 30–45 min | Nail tape / striping brush |
| Negative space | Beginner | 20–30 min | Nail tape |
| Marble effect | Intermediate | 40–60 min | Fine detail brush |
| Floral line art | Intermediate–Advanced | 45–90 min | Liner brush |
| Chrome / mirror effect | Intermediate | 30–45 min | Chrome powder + sponge |
Nail Art Black Design: Essential Tools and Products
Great nail art starts with having the right tools. You don’t need a professional kit to create stunning designs, but a few key items will make a huge difference.
- Thin liner brushes — essential for fine details and linework
- Dotting tools — create perfect dots and floral centers without freehand skill
- Nail tape or striping tape — for sharp geometric lines and clean edges
- Stamping plates and scraper — transfer complex patterns quickly and precisely
- Black gel or regular polish — choose based on your preferred longevity
- Matte and glossy top coats — switch up the finish to completely change the look
- Nail foil adhesive — for adding metallic accents and foil transfers
Choosing the right black polish formula
Not all black polishes are created equal. For nail art, you want a formula with good opacity in one to two coats — a streaky base will ruin even the most beautiful design. Gel polish offers the best canvas for detailed art because it stays tacky (before curing) and allows embellishments to adhere perfectly.
Pros and Cons of Black Nail Art Designs
Pros
- Works for every season and occasion
- Maximizes contrast — art pops on dark base
- Highly versatile (minimal to maximalist)
- Hides chips better than light colors
- Timeless — never goes out of style
- Pairs beautifully with any wardrobe
Cons
- Can feel too bold for conservative workplaces
- Dark polish shows wear on tips faster
- Some formulas require 2–3 coats for full opacity
- Intricate designs take longer to complete
- Removal can stain nails slightly
Common Mistakes to Avoid with Black Nail Designs
Even experienced nail enthusiasts make these missteps. Here’s what to watch out for:
- Skipping the base coat — Black polish is notorious for staining natural nails. Always apply a ridge-filling base coat first.
- Applying thick layers — Thick coats of dark polish take forever to dry and increase the risk of smudging. Build up coverage in two thin layers instead.
- Forgetting to seal the art — A quality top coat (or gel top coat if using gel) is non-negotiable. Without it, even the best design chips within days.
- Using low-quality art brushes — Cheap brushes splay and lose their shape, making fine linework impossible. Invest in at least one quality liner brush.
- Rushing the dry time — Dark polish shows finger-print smudges more than any other color. Allow each layer to dry fully before moving on.
- Overcrowding the design — More isn’t always more. A single well-executed detail on a clean black base often looks more sophisticated than ten competing elements.
Best Practices for Long-Lasting Nail Art Black Design
| Step | What to Do | Why It Matters |
|---|---|---|
| Prep nails | Clean, buff, push back cuticles, remove oils with alcohol | Removes residue that causes lifting and peeling |
| Base coat | Apply a ridge-filling or strengthening base | Prevents staining and creates adhesion |
| Polish layers | Two thin coats; allow each to dry | Avoids bubbling, streaks, and slow-dry issues |
| Art & embellishments | Work on one nail at a time; use thin layers of art polish | Keeps edges crisp and details legible |
| Seal & protect | Apply 1–2 coats of top coat; wrap the tips | Dramatically extends wear and prevents chipping |
| Maintenance | Reapply top coat every 2–3 days | Refreshes shine and extends the design’s life |
- Always wrap your free edge (the nail tip) with polish and top coat — this is where chipping starts.
- Wear gloves when washing dishes or using harsh cleaning products.
- Keep cuticle oil nearby and use it daily — hydrated cuticles mean healthier nail growth and a cleaner look.
- If a nail chips, don’t panic. A small brush dipped in black polish can touch up most chips invisibly.
Conclusion
Black nail art isn’t just a trend — it’s a form of self-expression that has stood the test of time. From sleek geometric patterns to hand-painted florals and futuristic chrome accents, the possibilities are virtually endless. What makes black such a powerful base is its ability to amplify everything placed on top of it.
Whether you’re a complete beginner reaching for nail tape and a striping brush, or a seasoned nail artist experimenting with foils and chrome powders, there’s a black nail design out there that fits your style and skill level. Start simple, build your confidence, and don’t be afraid to make it your own.
The most important rule? Have fun with it. Great nail art starts with a little creativity and the willingness to experiment — and a rich, moody black base makes every experiment worth showing off.
Frequently Asked Questions
For nail art, a black gel polish offers the best results due to its slow-dry nature (before curing), smooth application, and long-lasting wear. If you prefer regular polish, look for a formula with high opacity in 1–2 coats and a quick-dry formula to reduce smudging risk.
Contrast is key. Use light colors — white, gold, silver, or neon — for your designs on a black base. These colors naturally pop against dark backgrounds. Mixing finishes (matte base with glossy art, for example) also creates striking dimensional effects without additional color.
Absolutely. Several black nail art designs are beginner-friendly — negative space designs using nail tape, simple dots with a dotting tool, or even stamping designs using pre-made plates require minimal freehand skill and produce impressive results. Start with one accent nail to build confidence.
With regular polish, expect 5–7 days with a quality top coat. Gel black nail art can last 2–3 weeks with proper application and aftercare. Wrapping the nail tip and reapplying top coat every few days significantly extends longevity.
The biggest trends include geometric and graphic patterns, reverse marble (white veining on black), negative space designs, chrome and mirror-effect nails, and delicate floral line art. Mixing matte and glossy finishes on the same hand — a technique called mixed-media nails — is also hugely popular.
/ You May Also Read /
Why Professional Nail Care Services Are Worth Every Penny: A Complete Guide
The Ultimate Guide to Choosing an Acrylic Nail Kit Set Professional — Everything You Need to Know