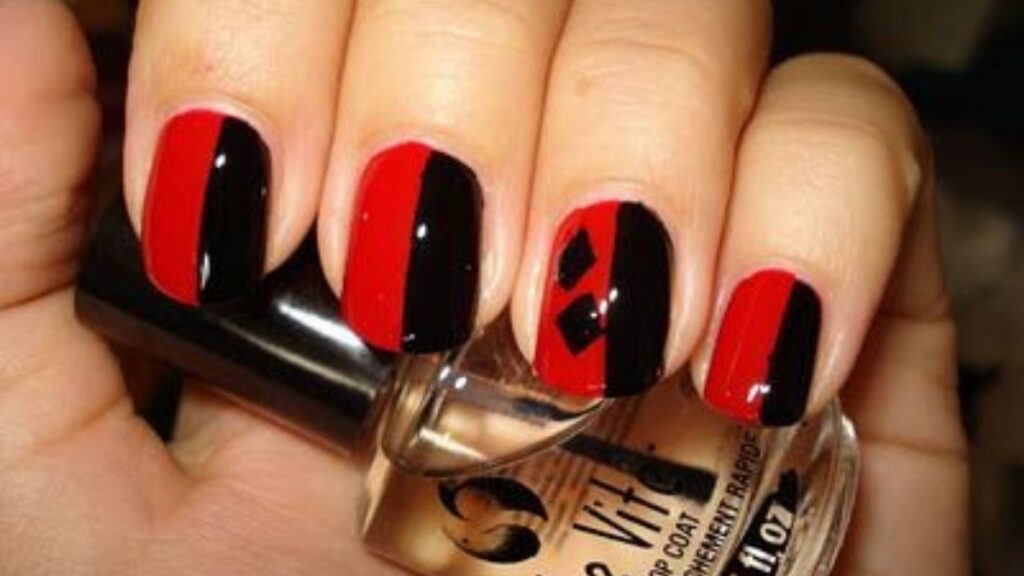
Harley Quinn nails have become one of the most requested nail art styles in salons and DIY manicure communities alike. This bold, rebellious look pairs bright red and jet black in playful, asymmetrical patterns that instantly turn heads. Whether you’re prepping for a costume event, a comic convention, or just want a manicure with attitude, this style delivers drama without feeling like a full costume commitment.
In this guide, you’ll learn what makes this nail trend so popular, how to recreate it at home or in the salon, common mistakes to avoid, and creative variations you can try based on your personal style.
What Are Harley Quinn Nails?
Harley Quinn nails are a nail art style inspired by the DC Comics character’s signature red and black color scheme. The look typically features split or asymmetrical designs, glossy finishes, diamond or heart accents, and sometimes small distressed or “cracked” patterns reminiscent of her jester aesthetic.
Unlike a simple two-tone manicure, this style leans into contrast and playfulness. Nails aren’t just painted one color per hand—they often mix patterns across individual fingers for a chaotic-yet-intentional effect.
Key Visual Elements
- Alternating red and black base colors across fingers
- Diamond or harlequin patterns on accent nails
- Glossy, high-shine top coat
- Occasional glitter or rhinestone accents
- Bold black outlines or geometric shapes
Why This Nail Style Has Stayed Popular
Comic-inspired beauty trends tend to spike around movie releases, but Harley Quinn’s look has held steady popularity for years. Part of the appeal comes from how customizable it is—you can go subtle with just one accent nail or go full drama across all ten.
Nail artists also love this style because it works for almost any nail shape or length, from short squoval nails to long stiletto tips.
How to Recreate Harley Quinn Nails at Home
You don’t need professional training to try this look. With a steady hand and the right tools, a salon-quality result is achievable at home.
Step-by-Step Application
- Start with clean, filed nails and a base coat to protect the natural nail.
- Paint your ring finger and thumb in solid black; paint the remaining nails in solid red (or vice versa for variety).
- Once dry, use a thin nail art brush to add diamond shapes on one accent nail using the opposite color.
- Add rhinestones or glitter accents while the polish is still tacky, or use nail glue afterward.
- Seal everything with a high-shine top coat to lock in the design and add durability.
Tools You’ll Need
- Thin detail nail art brush
- Black and red polish (gel or regular)
- Rhinestones or nail glitter (optional)
- Striping tape for clean geometric lines
- Glossy top coat
Salon vs DIY: Which Option Fits You Best
| Factor | DIY at Home | Professional Salon |
|---|---|---|
| Cost | Low, uses polish you already own | Higher, typically $35–$80 |
| Time | 30–60 minutes | 45–90 minutes |
| Precision | Good with practice | Consistently sharp lines |
| Longevity | 3–7 days (regular polish) | 2–3 weeks (gel/acrylic) |
| Customization | Fully flexible | Guided by artist’s technique |
If you’re attending a short event, DIY works well. For long-term wear or a convention week, a salon gel application will hold up better.
Popular Harley Quinn Nail Design Variations
Not everyone wants the exact same pattern. Here are a few popular spins on the classic look:
- Classic Split Design: One hand in solid red, the other in solid black.
- Diamond Harlequin: Alternating diamond patterns across all nails.
- Cracked Porcelain: A distressed black web pattern over red base nails.
- Glitter Bomb: Heavy glitter accents mixed with matte black nails.
- Minimalist Accent: Neutral base nails with just one red-and-black accent nail.
Nail Shape Recommendations
| Nail Shape | Best Design Style | Why It Works |
|---|---|---|
| Almond | Diamond harlequin pattern | Elongates the nail while showing detail |
| Square | Classic split design | Clean lines suit sharp edges |
| Stiletto | Cracked porcelain | Dramatic shape matches bold pattern |
| Round | Minimalist accent | Keeps a softer, wearable look |
Practical Examples
A short-nail office look might use one black accent nail with a small red diamond, keeping things professional yet playful. A convention-ready look might go full glam with matte black bases, glossy red diamonds, and rhinestone clusters on every finger.
Pros and Cons of This Nail Style
Pros:
- Highly customizable for any skill level
- Works with both short and long nails
- Great conversation starter and costume complement
- Doesn’t require full character makeup commitment
Cons:
- Detailed patterns take longer to apply
- Bold colors may chip visibly if not sealed properly
- Not ideal for conservative workplace dress codes
- Requires steady hands or practice for clean lines
Common Mistakes to Avoid
- Skipping the base coat, which causes red polish to stain nails
- Applying top coat too soon, smudging fine diamond details
- Using thick brush strokes for detail work instead of a fine liner brush
- Overloading every nail with glitter, making the design look cluttered
- Not cleaning up polish around the cuticle line, which looks messy in photos
Best Practices for a Long-Lasting Look
- Use gel polish if you want the design to last beyond a week
- Apply two thin coats rather than one thick coat for smoother finish
- Seal glitter or rhinestones with extra top coat layers
- Practice diamond patterns on a nail wheel before applying to real nails
- Keep cuticle oil nearby to maintain healthy-looking skin around the nails
Conclusion
Harley Quinn nails offer a fun, expressive way to bring bold color and playful pattern into your manicure routine. Whether you keep it simple with one accent nail or go all-in with rhinestones and diamond patterns, this trend adapts easily to your personal style and skill level. With the right prep, a steady hand, and quality top coat, you can achieve a salon-worthy look right at home.
FAQs
1. What colors are used for Harley Quinn nails?
The classic palette uses bright red and black, sometimes with white or silver accents for contrast.
2. Can I do Harley Quinn nails without nail art experience?
Yes, simple versions like a split red-and-black design require no advanced skill and can be done with basic polish and a steady hand.
3. How long do Harley Quinn nails last?
Regular polish designs last 3–7 days, while gel versions can last 2–3 weeks with proper care.
4. What nail shape works best for this style?
Almond and stiletto shapes show off diamond patterns well, while square and round shapes suit simpler split designs.
5. Are rhinestones necessary for this look?
No, rhinestones are optional. A clean red-and-black pattern alone captures the style effectively.
/ You May Also Read /
Best Nail Shapes for Long Fingers: A Complete Style Guide
Corpse Bride Nails: 15 Stunning Design Ideas for Your Next Manicure