If you’ve ever looked at a classic French manicure and thought “this could use a little more personality,” you’re not alone. White tips with nail art have completely transformed what used to be a simple, clean look into a versatile canvas for creativity. Whether you’re going for something subtle and romantic or bold and geometric, the combination of crisp white tips with decorative elements gives you the best of both worlds — timeless elegance with a modern twist.
In this guide, you’ll find everything you need to know about pulling off this trend beautifully — from design ideas and application techniques to tools, common pitfalls, and pro tips that make all the difference.
What Are White Tips with Nail Art?
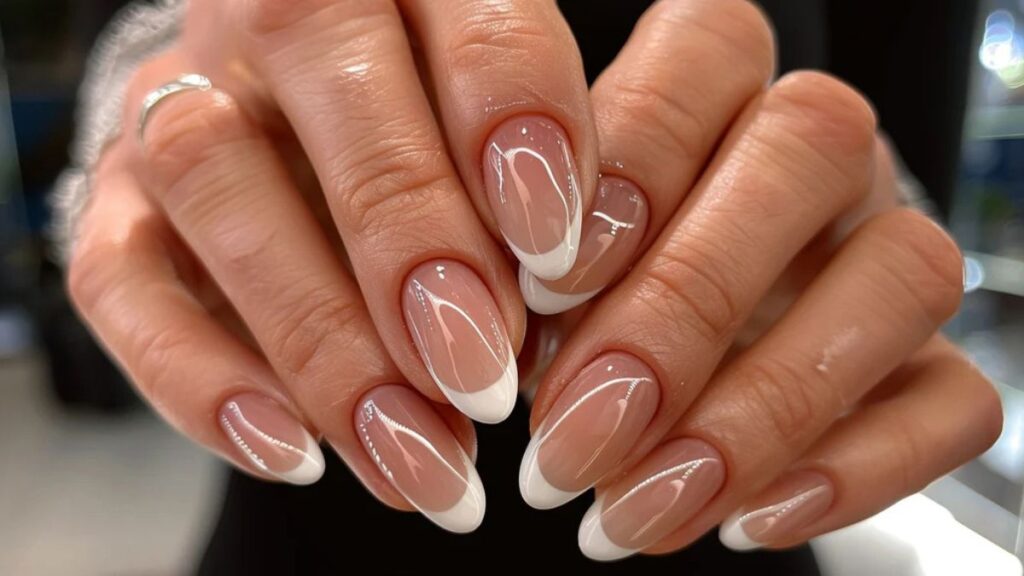
At its core, the white-tip nail look is an evolution of the French manicure. The natural or nude base stays intact, but the signature white tip becomes a design zone — a small but powerful strip where nail artists (or DIY enthusiasts) can add patterns, illustrations, florals, gems, foil, or abstract color plays.
This style works on virtually every nail shape: square, oval, almond, coffin, and stiletto. It suits both short natural nails and longer acrylics. That universal appeal is a big reason why it keeps trending season after season.
| Nail Art Style | Best For | Skill Level | Tools Needed |
|---|---|---|---|
| Minimalist line art | Everyday / Office wear | Beginner–Intermediate | Thin brush, black gel liner |
| Floral designs | Spring / Weddings | Intermediate | Dotting tool, petal brush |
| Geometric patterns | Modern / Editorial looks | Intermediate–Advanced | Striping tape, thin liner |
| Foil & chrome accents | Events / Party nails | Beginner (with foil kit) | Foil adhesive, foil sheets |
| 3D gems & pearls | Glamour / Bridal nails | Beginner | Nail glue, tweezers |
| Abstract watercolor | Artistic / Boho vibes | Advanced | Acrylic paints, fan brush |
Top White Tip Nail Art Design Ideas to Try Right Now
1. Delicate Florals on the Tip
Tiny painted flowers — daisies, cherry blossoms, or roses — nestled along the white tip create a romantically feminine look. Use a fine-tipped nail brush and acrylic paints for best control. Even a simple three-petal flower with a dot center looks incredibly polished.
2. Gold or Silver Geometric Lines
Use a nail striping brush or striping tape to create diagonal lines, triangles, or grid patterns across the white tip. Gold gel liner is especially stunning here — it catches the light beautifully and pairs well with both nude and transparent bases.
3. Ombre or Gradient Tips
Instead of a solid white tip, blend white into a soft pink, lavender, or champagne using a makeup sponge. Then layer subtle nail art on top. This adds dimension and softens the look beautifully.
4. Pearl and Gem Embellishments
Press tiny pearls or rhinestones along the smile line (the curved border between your natural nail and the white tip) for instant glamour. This technique requires no artistic skill — just nail glue and a steady hand with tweezers.
5. Foil Accents
Apply holographic or metallic foil over the white tip using a foil adhesive. The result looks complex but actually comes together in minutes. Silver foil on white tips has a real “glass nail” energy that photographs stunningly.
6. Negative Space Designs
Leave portions of the white tip bare or translucent and use liner to draw around negative space shapes — stars, moons, or asymmetric windows. This minimalist approach feels very editorial and modern.
How to Apply White Tips with Nail Aart at Home
Getting the white tip right is the foundation. Here’s a step-by-step breakdown of the process:
- Prep your nails: File, buff, and push back cuticles. Apply a base coat and let it dry completely.
- Apply the white tip: Use French tip guides (stickers) or freehand with a thin white gel or polish. A gel formula gives sharper, longer-lasting tips. Cure if using gel.
- Seal the tip: Apply one coat of clear topcoat over the white before adding art — this protects the base and gives nail art better adhesion.
- Add your nail art: Work on one nail at a time. Use fine brushes for detail work. If using gel paints, cure each layer before adding another.
- Apply topcoat: Seal everything with a glossy or matte topcoat, depending on the look you want. Encapsulate any 3D elements with extra coats for longevity.
One helpful trick: do your nail art before your final topcoat, so any small mistakes can be corrected without redoing the whole nail.
| Finish Type | Effect on Nail Art | Recommended Topcoat |
|---|---|---|
| High-gloss | Amplifies color vibrancy, adds depth to florals and gems | Seche Vite, HK Girl |
| Matte | Softens colors, makes line art pop with a velvety feel | Sally Hansen Matte Coat |
| Satin | Subtle sheen; works beautifully with minimal designs | OPI Infinite Shine |
| UV gel topcoat | Hardest finish; essential for longevity and 3D elements | Modelones, Beetles UV Top |
Pros and Cons of White Tips with Nail Art
Pros
- Works on all nail lengths and shapes
- Highly versatile — suits casual and formal occasions
- Easy to customize at home with simple tools
- Timeless base with room for creative expression
- Photographs beautifully in natural and studio light
- Can be done with gel or regular polish
Cons
- White tips show chips and yellowing faster than other colors
- Intricate nail art requires practice and patience
- Can look overdone if overcrowded with too many elements
- Gel versions require UV lamps and more investment
- Grows out noticeably faster on longer nails
Common Mistakes to Avoid
Skipping the base coat: This leads to staining, especially with white polish which can cling to the natural nail surface and cause yellowing over time.
Using thick coats of white polish: White polish is notoriously streaky. Apply thin, even layers and build up gradually rather than trying to cover in one thick stroke.
Adding nail art on wet polish: Always let each layer dry or cure completely before moving to the next step. Working on a tacky layer causes smearing and ruined designs.
Overcrowding the tip: The white tip is a small canvas. Trying to add too many elements at once looks cluttered. Pick one or two complementary design elements and keep it intentional.
Skipping topcoat over nail art: Nail art painted directly on the nail without a sealing topcoat scratches off within days. Always seal your designs for lasting wear.
Using low-quality white polish: Cheap white polishes tend to be sheer, streaky, or yellow quickly. Invest in a quality white gel or professional nail polish specifically formulated for tips.
Best Practices for Long-Lasting White Tip Nail Art
1Always start with clean, oil-free nails. Use a lint-free wipe and alcohol-based cleanser before your base coat to ensure maximum adhesion.
2Use gel-based white for tips when possible. Gel gives a sharper, crisper smile line and lasts significantly longer than regular polish tips.
3Work in a well-lit space. Nail art precision is dramatically easier when you can clearly see what you’re doing. A desk lamp or ring light is a game changer.
4Practice your art design on paper or a practice hand before committing to your nails. This is especially useful for florals and line work.
5Cap the free edge of your nail with topcoat on every application. This means running the brush along the very tip of the nail to seal the edge and prevent peeling.
6Reapply topcoat every 2–3 days to extend wear, keeping nail art looking fresh and preventing chipping.
7Store nail art tools properly. Brushes should be cleaned immediately after use and stored horizontally or upright with caps on to preserve their fine tips.
| Occasion | Recommended White Tip Art Style | Color Accent Suggestion |
|---|---|---|
| Everyday / Work | Minimalist lines or negative space | Nude, beige, or soft gray accents |
| Date Night | Pearl gems along the smile line | Rose gold or champagne foil |
| Wedding / Bridal | Delicate florals or lace-inspired lines | Soft blush pink or ivory |
| Party / Event | Holographic foil or chrome accents | Silver, iridescent, or holographic |
| Seasonal (Spring/Summer) | Tiny florals or butterfly motifs | Lilac, sky blue, or coral |
| Seasonal (Fall/Winter) | Geometric or abstract line art | Burgundy, forest green, or deep navy |
Conclusion
White tips with nail art bring together the understated elegance of a French manicure with the playfulness of nail design — and the results can be truly stunning, whether you’re going simple or all out. The key is preparation, patience, and a willingness to experiment until you find the designs that feel most like you.
You don’t need to be a professional to pull this off. With the right tools, a little practice, and the tips covered in this guide, beautiful white tip nail art is very much within reach. So pick a design, gather your supplies, and start creating something you’ll love showing off.
Frequently Asked Questions
With regular polish, expect 5–7 days of wear. Gel-based white tips with a proper UV gel topcoat can last 2–3 weeks. Reapplying topcoat every few days extends the life of both the tip and the art.
Absolutely. Short nails actually look great with white tips — the tip creates the illusion of length. Keep your nail art minimal and delicate on shorter nails to avoid a crowded look.
For regular polish, look for formula that’s opaque in 1–2 coats and specifically labeled for French tips. OPI Alpine Snow and Essie Blanc are popular picks. For gel, a bright white builder gel or gel polish from brands like Beetles or Modelones works very well.
French tip sticker guides are your best friend for beginners. Apply them just above the smile line, paint over with white, let it dry slightly, and peel off carefully. Alternatively, freehand the line with a thin nail art brush and clean up any mistakes with a small brush dipped in acetone.
Yes, especially with minimalist designs. Simple line art, pearl accents, or negative space florals on white tips read as polished and put-together rather than flashy. Stick to neutral or metallic accents for a workplace-appropriate finish.
/ You May Also Read /
Why Professional Nail Care Services Are Worth Every Penny: A Complete Guide
The Ultimate Guide to Professional Nail Supplies: What Every Nail Tech Needs in 2026