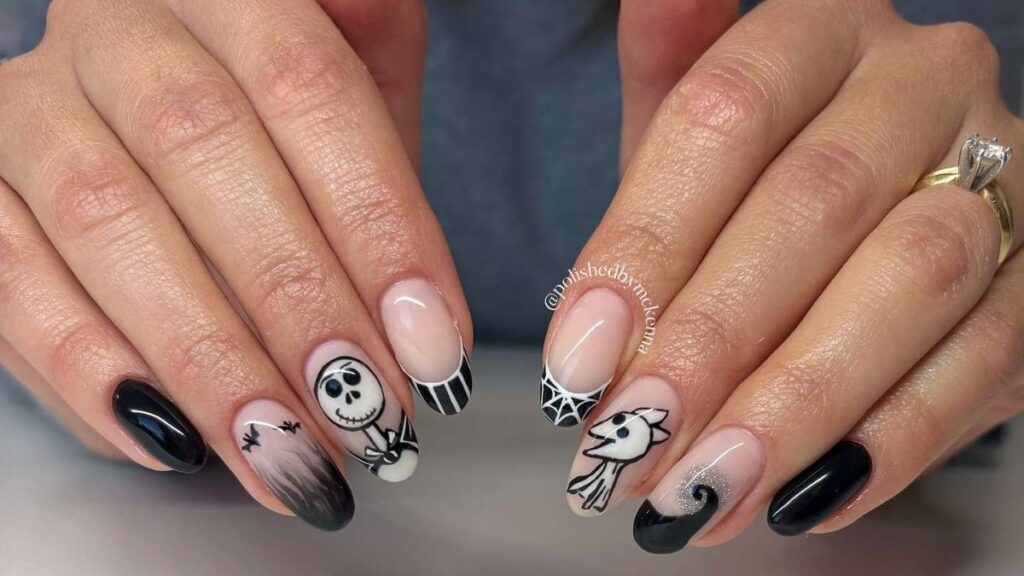
Nightmare Before Christmas nails have become one of the most requested nail art styles during the fall-to-winter transition. This spooky-meets-festive look blends gothic detailing with holiday cheer, giving you a manicure that feels playful, dramatic, and completely on trend.
If you love the idea of mixing Halloween shadows with Christmas sparkle, this style gives you the perfect middle ground. It’s whimsical, a little eerie, and endlessly customizable.
In this guide, we’ll walk through design ideas, color palettes, application tips, and mistakes to avoid, so you can create a manicure that turns heads at every holiday gathering.
What Are Nightmare Before Christmas Nails?
Nightmare Before Christmas nails are a nail art style inspired by gothic-holiday aesthetics: think swirling black-and-white patterns, deep purples, moody blues, and pops of orange or silver. The look draws on spooky storytelling elements combined with classic winter symbols like stars, snowflakes, and stripes.
This style works especially well from late October through December, since it bridges two seasons without feeling out of place in either one.
Key Visual Elements
Most designs in this category share a few recurring features:
- Swirling or spiral patterns in black and white
- Deep jewel tones like purple, emerald, and midnight blue
- Metallic silver or gold accents
- Striped or checkered detailing
- Small motifs like stars, moons, or snowflakes
- Matte and glossy finish combinations
These elements can be mixed and matched depending on how bold or subtle you want your manicure to look.
Popular Nightmare Before Christmas Nail Design Ideas
There’s no single “correct” way to wear this trend. Instead, it’s about layering spooky and festive details until you land on a combination that feels personal.
Classic Black and White Swirls
This is the most recognizable version of the style. Thin, hand-painted spirals in black and white create a hypnotic, storybook effect across the nail bed.
Starry Night Accents
Adding tiny silver or white stars against a matte black base gives a cosmic, wintery feel without leaning too heavily into either theme.
Striped Contrast Nails
Bold vertical or diagonal stripes in black, purple, and white mimic classic gothic patterning while still feeling seasonal and festive.
Ombre Moonlight
A soft gradient from deep purple to black, finished with a subtle shimmer, works beautifully for anyone who wants drama without heavy detailing.
Here’s a quick breakdown of these design styles side by side:
| Design Style | Difficulty Level | Best For | Finish Type |
|---|---|---|---|
| Black and White Swirls | Advanced | Bold statement looks | Glossy |
| Starry Night Accents | Beginner | Everyday wear | Matte or Glossy |
| Striped Contrast | Intermediate | Party or event nails | Glossy |
| Ombre Moonlight | Intermediate | Subtle elegance | Shimmer finish |
Best Color Palettes for This Nail Trend
Choosing the right color combination makes or breaks this look. The goal is balance — spooky enough to feel gothic, festive enough to feel like the holidays.
Traditional Gothic-Holiday Palette
- Black
- Deep purple
- Silver
- White
This combination is timeless and works for almost any nail shape or length.
Bold Contrast Palette
- Black
- Burnt orange
- Emerald green
- Gold
This version leans more Halloween-forward while still incorporating winter tones.
Soft Pastel Twist
- Lavender
- Icy blue
- Charcoal gray
- Pearl white
This softer palette is great for anyone who wants the aesthetic without heavy dark shades.
How to Create Nightmare Before Christmas Nails at Home
You don’t need professional training to try this look. With a steady hand and the right tools, you can recreate several design variations yourself.
Tools You’ll Need
- Thin detail nail brush
- Dotting tool
- Base coat and top coat
- Black, white, purple, and silver polish
- Striping tape (optional)
Step-by-Step Application
- Apply a base coat and let it dry completely.
- Paint your chosen background color and allow it to cure.
- Use a thin brush to add swirls, stripes, or star details.
- Let each layer dry before adding the next design element.
- Seal everything with a glossy or matte top coat.
Patience matters here. Rushing between layers is one of the most common reasons designs smudge or lose definition.
Pros and Cons of This Nail Art Style
Like any trend, this look has strengths and a few limitations worth knowing before you commit.
| Pros | Cons |
|---|---|
| Highly customizable | Detailed designs take longer to apply |
| Works for both Halloween and Christmas | Requires steady hand for intricate patterns |
| Great for statement nails | May need touch-ups for special events |
| Wide range of color options | Not ideal for very short nails with tiny detailing |
Overall, the flexibility of this style makes it worth trying, especially if you enjoy experimenting with nail art.
Common Mistakes to Avoid
Even experienced nail art fans run into a few recurring issues with this design style.
- Skipping the base coat, which leads to staining and uneven color.
- Using thick polish layers, causing smudged swirls or stripes.
- Overcrowding the design with too many elements at once.
- Ignoring nail shape, since some patterns suit almond or coffin shapes better than short square nails.
- Rushing the top coat, which can distort delicate linework.
Avoiding these small missteps makes a noticeable difference in the final result.
Best Practices for Long-Lasting Results
To keep your manicure looking sharp for as long as possible, follow these simple habits.
- Always cure or dry each layer fully before adding details.
- Use a high-quality top coat to protect fine linework.
- Moisturize cuticles regularly to prevent chipping at the edges.
- Reapply top coat every few days to extend wear time.
- Choose gel polish if you want the design to last two weeks or longer.
These small adjustments help preserve intricate designs, especially ones with fine swirls or stripes.
Conclusion
Nightmare Before Christmas nails offer a fun, expressive way to celebrate the overlap between spooky season and holiday cheer. Whether you prefer bold swirls, subtle stars, or a full gothic-glam palette, this trend adapts easily to your personal style.
With the right tools, a little patience, and the color combinations above, you can create a manicure that feels festive, dramatic, and completely unique to you.
Frequently Asked Questions
1. What colors work best for Nightmare Before Christmas nails?
Black, deep purple, silver, and white are the most popular choices, though burnt orange and emerald green also work well for a bolder look.
2. Can beginners try this nail art style?
Yes. Simpler designs like starry accents or ombre backgrounds are beginner-friendly, while swirls and stripes may require more practice.
3. How long does this manicure typically last?
With gel polish and proper top coat maintenance, this style can last up to two to three weeks.
4. Is this style only appropriate for Halloween?
No. Because it blends spooky and festive elements, it works well from October through the end of the holiday season.
5. What nail shape works best for detailed designs?
Almond and coffin shapes typically provide more surface area for intricate patterns, though square nails work well for simpler designs.
/ You May Also Read /
Corpse Bride Nails: 15 Stunning Design Ideas for Your Next Manicure